To avoid adding a broken ring, you can mount your assists directly onto your lures. Here's a simple tutorial to help you make your own assist hooks.
Materials required
Unlike assist hooks mounted on broken rings, it's important to use a specific "assist line" braid, which is much more resistant to abrasion, as undulating lines sometimes have slightly sharp edges.
Assembling your own assists allows you to choose the hooks you want, as bream hooks are generally used for their spiciness and strength.
Here are the materials I use for my montages:
-
Assist line YGK Galis 80lb
-
Devaux special streamer fly-tying thread
-
BKK Shinu HG n°2 hook (size to be adapted according to lure size)
-
Devaux UV varnish
-
Cyano glue
-
UV lamp
-
Fly vice

Assembly in detail
1) After placing the hook in the vice, I wind my assembly line about halfway up the shank.
2) I then cut an assist line of about 3 cm which I block with 2 turns under the hook.
3) I then generously soak the beginning of the assembly in cyano before passing the assist line through my undulator (watch out for the direction).
4) Then I tie it up, tightening all the visible length. The glue then spreads everywhere, guaranteeing the solidity of the assembly.

5) I then finish with 2 or 3 half-keys, which I finish again with a dot of glue. I then wait a few minutes for the glue to dry perfectly, to avoid any reaction with the UV varnish.
6) I then apply a few drops of varnish that I spread evenly for a cleaner finish, a quick burst of UV light and my assist is finished!

Final result
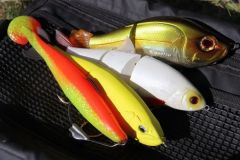
Here are a few examples of PTL craft ripples I've assembled with home-made assist hooks without broken rings.

In addition to the advantages of hook and ligature color choices (and the absence of a broken ring for discretion), the satisfaction of "do-it-yourself" is once again evident with the creation of your own assist hooks.

 /
/ 


