
An AIS beacon such as Ocean Signal's MOB1 can read your boat's MMSI to display its coordinates in the event of a fall overboard.
In the event of damage or a fall, the shipwrecked person can send the position and name of the vessel he or she was in to nearby boats. To do this, the AIS beacon must be configured. Let's take a look at the MOB-1 beacon.
Step 1: The Oceansignal.com website
Go to https://oceansignal.com/support/product-programming/mob1-programming/?countryId=870 and , you'll go straight to the MOB-1 programmer.
Step 2: Download the France configuration software
At bottom left, in the "MOB1 Configuration Installer - English version" box, click on "MOB1 Configuration Installer - English version" DOWNLOAD FOR WINDOWS PC ".
Step 3: Install the application
Double-click on the "Installer-Zone4.msi" installer you've just downloaded. The "Mob Config" software installs, click "Next" 3 times, then "Close" to finish.
Step 4: Launch the software
Start the software. The "MOB Configuration for DSC" interface appears, enter your boat's MMSI and check the "Enable DSC Relay" box. Click on "Update Device" at bottom left, and on the next screen click on "Yes" at bottom left.
Step 5: Preparing the beacon
The beacon is delivered secured by the sliding red plastic cover. Lower it to switch on the beacon.
Place the black rubber cover, leaving the hole on the left side to reveal the lens.
The button on the right is used to press the T (test) button on the beacon.
It's time to put the beacon into programming mode. To do this, press the T (test/off) button for at least 15 seconds. The LED flashes red.
Proceed immediately to step 6!
Step 6: Scan the beacon
Position the tag opposite the white box and press the "F10" key.
The white square flashes, and the vertical bar on the right displays progress.
Once the tag has been scanned, a green rectangle appears. Enter the tag, the LED flashes:
- Green: successful. Switch off the beacon by pressing the T (test/off) button for one second. The LED flashes red twice. On the computer, press the "F12" button to exit programming mode.
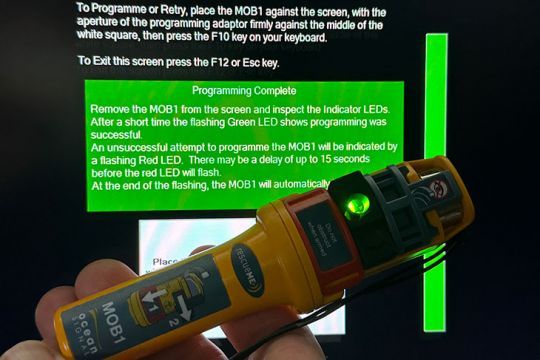
The LED flashes green - it's a success! - Red: failed. Switch off the beacon by pressing the T (test/off) button for one second. The LED flashes red twice. Repeat step 4.
All that remains is to install the beacon in the self-inflating vest, which we'll see in the next part of the article.


